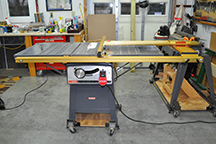
I have owned this old Craftsman 10” table saw since 1970. I was working construction during the summer months while going to college full time for the remainder of the year. I remember my dad’s disappointment when he found out that I had spent about $270 for the table saw when my summer money was supposed to be going to support myself during the nine months of college! My plan was to retire it and get a new Saw Stop unit before going into retirement. Well the great recession happened and on June 2, XXXX I and 35 others at the manufacturing facility where I work were laid off. I was XX years old and not ready for retirement or Social Security. My vision of a new Saw Stop went down the drain. Well I finally made it to retirement and I have had discussions with myself on how to upgrade this old Craftsman table saw. It was in great shape but the two biggest disappointments with the saw were the miter gauge and the rip fence. The miter gauge was the first item to be replaced. I elected to go with the Incra 1000SE which had a street price of around $120 at the time of purchase. The difficult decision was the rip fence system for the saw.
 After a lot of study I narrowed the search down to Incra and Biesemeyer They were similar in price and accuracy. The Incra unit has a 1/32” accuracy while the Biesemeyer is 1/64”. I find 1/32” accuracy adequate for woodworking as moisture can change the wood by that amount with just a weather change and I have enough trouble reading a ruler to a 32nd of an inch let alone a 64th of an inch.
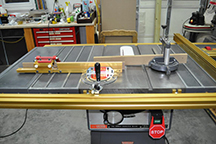
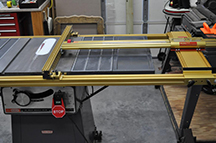
The fence system consists of two aluminum extrusions or rails that you bolt to the front and rear of your table saw, the base mount assembly and finally the LS fence assembly/positioner. For more details see photo below.
 The front and rear aluminum extrusions or rails mount directly to the front and back of your table saw. Initially I did not have to drill any holes into the front or back of the table saw top (more on that later). Incra provided all of the mounting hardware and mounting brackets with the package I purchased and the instructions were well written, illustrated and not in Spanish!
The base mount assembly was very straight forward and did not require you to be a rocket scientist however attaching the positioner to the base mount turned out to be very challenging. The base mount plate is an Aluminum extrusion that runs from front to back of the table saw and sits on the front and back mounting rails. The positioner sits on top of the mounting plate and is held in place by 8 #10-32 x 3/8” Phillips pan head screws. You have to loosely attach the 8 screws with washers and hex nuts to the positioner and then thread the assembly into the slots on the base mounting assembly. This process was extremely challenging and required a couple of trips to the house to restock up on a good single malt scotch. The problem was the alignment of the hex nuts with the slots on the aluminum extrusion. Getting everything aligned was difficult and this was followed by the nuts falling off of the machine screw. It required great patience. Mounting the positioner to the base plate was the most difficult and time consuming part of the whole assembly process.
Once the unit was fully assembled calibration was simple. To calibrate the rip fence to the system you raise the saw blade up to about two inches, move the rip fence until it just kisses the edge of the saw blade and you are almost finished. All that remains for the calibration is to take the 36” metal ruler, place it on the magnetic strip on the unit and slide it into position so that it reads zero inches under the curser on the LS positioner.
The big challenge on installing the Incra TS/LS rip fence system had to deal with my old saw and its blade guard assembly. To make this work with my saw I needed to cut the rear rail to accommodate the blade guard assembly. This was somewhat scary because if I screwed up I would be purchasing a new rear rail along with its shipping charges! I did not want to screw up. After cutting the rear rail I needed to drill two holes in the rear of the table saw top to accommodate two rails instead of one rail. This turned out to be very straight forward because of the great documentation that came with the system. At this point in time I thought the installation was complete but I discovered later on that I still needed to do some adjustments with the rear rail to accommodate the blade guard assembly when the blade was tilted to 45 degrees.
I have been using the rip fence system for a little more than three years now and I am extremely satisfied with its performance. The hardest part of getting adjusted to the new rip fence system was to trust it. For some 40 years I used the rip fence that came with the saw and I was used to its alignment problems from front to back. For months after installing the new rip fence system I was always measuring from the blade to the rip fence to check the measurement. The new system was always dead on and did not need to be recertified with each rip fence movement.
So why did I wait so long on purchasing this rip fence system? I think that my reluctance had to do with the initial cost of the saw versus the cost of the new rip fence. Here I was putting about $400.00 into a rip fence system on a saw that I only paid $270.00 for back in 1970 (I never adjusted my initial cost for inflation). One of the side benefits of this rip fence system is that you can add a router table top to the mounting rails on either side of the saw. More about this in a future product review.
For more information on the rip fence system go to www.incratools.com and click on the table saw TS/LS rip fence system. There are three videos you can watch on the system.
Gary Stephens

